![]()
Clip Inventory
Exports every visible clip on your selected video tracks to an Excel spreadsheet — with thumbnails, reel names, timecodes, and durations — so you have a clean starting point for adding VFX shot codes and other metadata by hand.
Handles messy timelines
Clip Inventory accounts for multi-track occlusion (a clip on a higher track hides what's underneath it) and transitions (dissolves, wipes, fades), so you don't need a perfectly tidy single-track timeline before exporting.
Launching it
Workspace → Scripts → Edit → 01 Clip Inventory, with a timeline open in Resolve's Edit page.
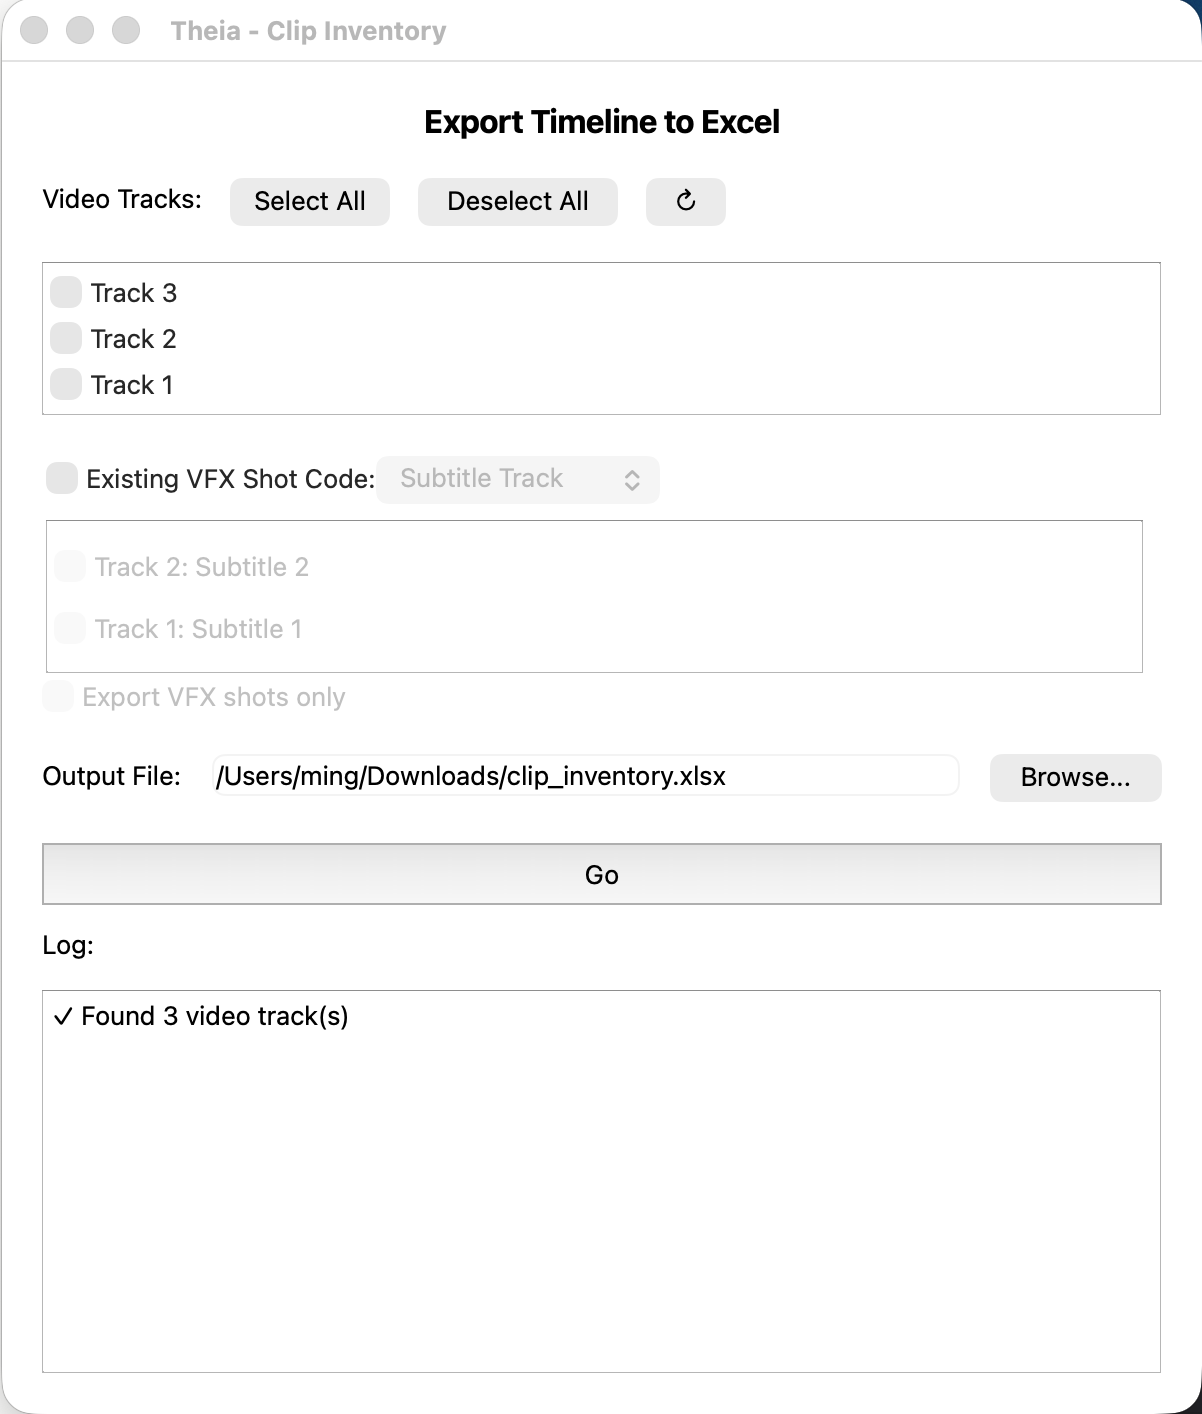
Interface reference
Video Tracks
A checklist of every video track on the current timeline, highest track on top (matching Resolve's own track order). All tracks are checked by default.
- Select All / Deselect All — bulk-check or uncheck every track.
- ↻ (refresh) — re-reads the track list from Resolve. Use this if you open a different timeline while the window is already open.
- If no timeline is open, or Theia can't reach Resolve at all, the list falls back to a single "Track 1" checkbox so the window still opens.
Only clips on checked tracks are considered. Unchecked tracks are treated as if they don't exist — they won't occlude clips below them either.
Existing VFX Shot Code
An optional checkbox that lets you pull existing shot codes into the export, if your timeline already has them marked some other way. When checked, a dropdown lets you choose the source:
- Subtitle Track — reads shot codes from a subtitle track's text. Checking this reveals a second checklist of subtitle tracks on the timeline; pick exactly one (selecting a different one automatically deselects the previous choice).
- Duration Marker — reads shot codes from timeline markers instead of a subtitle track.
Export VFX shots only (enabled only when "Existing VFX Shot Code" is checked) restricts the export to just the clips that have a shot code from the selected source, skipping everything else.
Output File
Where the .xlsx file gets saved. Defaults to ~/Downloads/clip_inventory.xlsx. Use Browse... to pick a different location, or type a path directly.
Go
Starts the export. The log panel below streams progress live: which tracks are being processed, which clips are visible vs. occluded, and how transitions were classified. When it finishes, a dialog reports how many clips were exported and offers an Open File button to launch the spreadsheet immediately.
What ends up in the spreadsheet
One row per visible portion of a clip — if a clip is partially covered by something on a track above it, only its visible range becomes a row. Columns, left to right:
| Column | Contents |
|---|---|
| Thumbnail | A frame grabbed from the middle of the clip's visible range. |
| Reel Name | The clip's reel/source name from Resolve's media pool. |
| Cut Order | Sequential position in the timeline, 1-based. |
| Record In / Record Out | Timeline (record) timecode for the visible range. These headers are bold so they stand out — keep them named "Record In" / "Record Out" if you rename columns, since Add Metadata auto-detects them by that name. |
| Duration | Length of the visible range. |
| Source In | The source-clip timecode corresponding to the start of the visible range. |
| VFX Shot Code | Only present if "Existing VFX Shot Code" was enabled — the shot code read from the subtitle track or duration marker. |
| Metadata (column H onward) | Left blank. This is where you fill in your own VFX shot codes, vendor assignments, descriptions, or anything else your pipeline tracks. |
How occlusion and transitions are handled
Clip Inventory walks the timeline from the highest selected track down to the lowest, keeping a running record of which parts of the timeline are still "unclaimed." A clip only produces a row for the portion of its range that hasn't already been claimed by something on a track above it. Once every frame of the timeline has been claimed, lower tracks are skipped entirely — there's nothing left for them to be visible in.
Transitions (anything Resolve labels as a dissolve, wipe, or fade) are never exported as their own row. Instead, they're folded into the adjacent clip's range:
- A dissolve between two clips on the same track is treated as a hard cut at its midpoint — the back half goes to the outgoing clip's range, the front half to the incoming clip's.
- A dissolve at the end of a clip (fading to nothing, or to another track) extends that clip's exported range to cover half the dissolve.
- A dissolve at the start of a clip (fading in from nothing) extends that clip's range backward to cover half the dissolve.
Disabled clips (clips you've disabled in Resolve without removing them) are skipped entirely.
Tips
- If a thumbnail looks like it came from the wrong clip on a busy multi-track section, that's the one case worth double-checking after export — Theia momentarily solos each track to get a deterministic thumbnail, but extremely fast cuts can occasionally still grab a neighboring frame.
- Run the export again any time after editorial changes — it always reads live from whatever timeline is currently open, so there's no "stale" state to worry about.
- See the Export a Clip Inventory workflow for the full step-by-step including what to do with the spreadsheet afterward.